GREAT SPECIALS!
We're making way for new stock, so take advantage of the following Steiff-Schulte specials! You can order online, fax, phone or email your order as quantities are very limited! The early bird catches the worm with these unusal mohairs!
Plus ... complimentary postage on 'Specials' orders!
Click here to view all Specials on our website
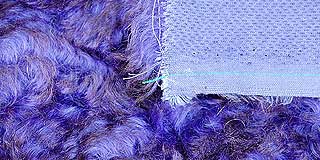
Indigo blue with black tip. TSWD89/27 #9713
Ultra luxurious, dense swirly distressed 27mm pile.
Special only R340 per 1/4m.
→ Click here to view the product on our website
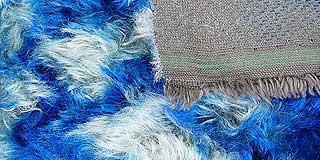
Batik dyed, light and dark variegated blue. TSWD89/25 #9624
Dense, swirly distressed 25mm pile.
Special only R330 per 1/4m.
→ Click here to view the product on our website
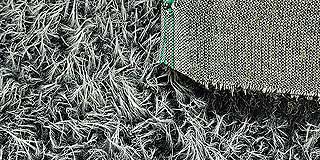
Hedgehog–style Steiff Schulte synthetic. TSYN31/32 #9060
Ultra dense, charcoal straight pile with off-white hard tip.
Would make a lovely larger sized hedgehog as the pile is 32mm long!
Special only R250 per 1/4m.
→ Click here to view the product on our website
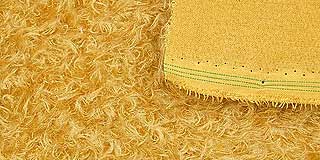
Teddy Tan with interwoven gold thread. M83/25/G #4704
Matted 25mm pile.
Special only R270 per 1/4m.
→ Click here to view the product on our website
and an ULTRASUEDE SPECIAL too!
Complement your Steiff-Schulte mohair purchase with contrasting or matching ultrasuedes.
Use for paws, footpads or just as an additional trim (neck ties etc).
Only R30 per piece.
→ Click here to view these products on our website
Back to Basics, Part 4
 Our 'Back to Basics' section has provided some useful hints, which we hope has improved your bearmaking skills and experience. So far we have covered the topics of kit and pattern selection, making templates and choosing fabrics for your bear. The next step is to use your templates to mark the pattern on to the fabric backing.
Transferring the pattern to your fabric
Match the pile direction
It's important to determine the pile direction of your fur and then to match that up with the pile direction marks on your pattern pieces. If necessary, draw a little arrow on the selvedge on the back of your fur as a reminder!
Trace on the reverse side (backing) of the fabric
Place all the templates on the reverse side of your fur, ensuring that you have all the relevant pieces and that the whole bear will fit on the fabric. If a layout has been provided with the pattern, then use that as a guide.
Starting from the one side, securely hold the template in place, and carefully trace around it using a gel pen or pencil. Don't omit to mark all the relevant opening marks and joint marks that are indicated on the pattern pieces onto the fabric as this will make it a lot easier than trying to do it later.
Check again
Before cutting, check again that you have traced the required number of shapes for your bear. Nothing worse than having cut everything out and you realise you have omitted to trace a particular piece!
Cut out!
Using small, sharp scissors, cut each shape out, ensuring that you remove the traced ink lines as much as possible. This is an important step as any ink lines left could come off on to your fingers as you are working with the fur and get transferred back to the fur again, leaving unsightly marks. Remember too, to snip the backing fabric only rather than cutting through the fur pile on the front.
Now pack your templates and fabric shapes in a zip lock bag or small box,
ready for the next step of assembling your bear.
S A Guide Dogs Fund Raising Get–Togethers
Our 2012 once-a-month get–togethers yielded a grand total of R4650 and this donation has been presented to Di Turner of SA Guide Dogs, KZN branch. A special thanks, once again, to all those ladies who have so generously supported our fund-raising efforts for this worthy cause. We're delighted to add that we are proud sponsors of another puppy!
Beary warm regards
Eunice & Di


 Our 'Back to Basics' section has provided some useful hints, which we hope has improved your bearmaking skills and experience. So far we have covered the topics of kit and pattern selection, making templates and choosing fabrics for your bear. The next step is to use your templates to mark the pattern on to the fabric backing.